TECHNICAL TIP
Protein Quantitation Made Easy
John Proctor, Ph.D., Director, Worldwide Application Support
One of the easiest applications to run on an Octet system is protein quantitation. Using a pre-made biosensor endowed with a functional group, the system dips the biosensor into a well containing the analyte and measures the signal in real time. This is so easy that most customers will tell you that the hardest part about running a direct quantitation assay on the Octet is pipeting the samples into the plate! There are no columns to equilibrate, no plates to wash, and no complicated protocols to write. The sections below describe some considerations to ensure that your next Octet quantitation assay is not only easy to run, but provides the most accurate and precise data possible.
Assay Setup
Each experiment requires two commercially available black polypropylene flat bottom plates. The first plate (standard 96-well plate only) is for pre-wetting the biosensors. The second plate, used for samples, can be either a 96-well plate or a 384-well plate, depending on which Octet instrument you are using. If using one of the higher-throughput Octet 384 instruments, a third reagent plate can also be used for regeneration solutions if desired. The plate types and volumes can be:
- Standard 96-well plate = 200 µL
- (Greiner Bio-One part no. 655209)
- Half-area 96-well plate* = 80 µL
(for all instruments except the Octet RED and Octet RED96 systems)
*Use of half-area, polystyrene 96-well plates may be affected by non-specific adsorption of protein from solution on the plate surface. User discretion advised.
- Standard 384-well plate = 120 µL
(384 instruments only) (ForteBio part no. 18-5080 [pack]; 18-5076 [case])
- Tilted-well 384-well plate = 40 µL
(384 instruments only) (Greiner Bio-One part no. 781209)
To run the assay, follow these simple steps:
- Turn on the instrument and allow it to warm up for 1 hour.
- Pipette running buffer into the pre-wetting plate and place it under the biosensor tray. The biosensors require a minimum of 10 minutes pre-wetting prior to running an experiment — but the software includes a built-in delay and will start the read automatically after the time specified.
- Pipette the samples and standards into the sample plate.
- Place the biosensor tray and sample plate in their respective positions in the instrument.
- Choose the appropriate protocol from the drop-down menu — several pre-written protocols are available. You can also create your own customized protocol.
- Fill in the plate map with information about your samples and standards and click "Go".
- Once the run is complete, load the data into Data Analysis Software, choose a standard curve equation, and click "Fit Curves". See an example in Figure 1.

Figure 1A: Direct quantitation real-time binding data from the standards binding to Protein A biosensors. Standard concentrations were: 0.025, 0.05, 0.1, 0.25, 0.5, 1, 3, 10, 30, 100 and 300 µg/mL. |
Figure 1B: Calibration curve from standards assayed in Sample Diluent. Four replicates were measured for each concentration level. |
Table 1: Average calculated concentration and errors (%CV) of unknown samples in Sample Diluent. |
Biosensors for Direct Quantitation
ForteBio offers six biosensor types that can be used right out of the package to directly quantitate proteins and antibodies. The Protein A, Protein G, Protein L, Anti-Human IgG Fc, Anti-Murine IgG Fv, and the Anti-Penta HIS biosensors are ready for use. Using these biosensors with the standard protocol, one can quantitate a full plate of samples in as little as 15 to 30 minutes depending on the plate type chosen.
For customers that want to create their own biosensor with a specific chemistry on the surface, ForteBio offers the Streptavidin (SA) biosensor, enabling attachment of any purified molecule containing a biotin tag. Biotinylation of the protein can be performed easily by following our Technical Notes Nos. 11 and 28. ForteBio also offers the Sidekick Immobilization Station, which enables immobilizing molecules onto 96 biosensors simultaneously in as little as 10 minutes with increased loading precision. For more information on using the SA biosensors to quantitate proteins in solution, please refer to Technical Notes Nos. 9, 10, and 28.
Assay Considerations
For the most accurate and robust assay possible, there are a few assay parameters to consider.
- The best standard to use in the calibration curve is a protein or antibody of the same isotype and subtype as the one being quantitated.
- When prewetting the biosensors, it's best to use the media or buffer in which the assay will be run.
- It's important to use the same buffer to dilute both samples and standards.
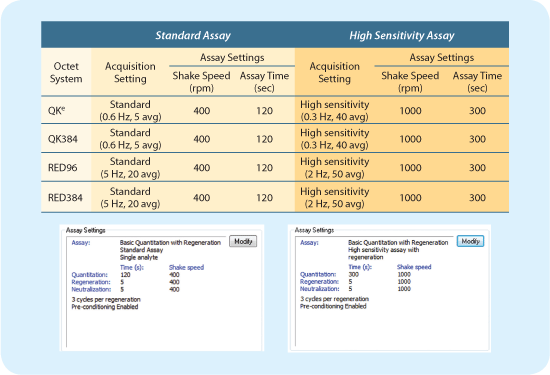
- Depending on the expected concentration of the unknowns, the flow rate (RPM) and assay time should be adjusted accordingly; slow RPM and short assay time for highly concentrated samples and fast RPM and longer time for low concentration samples (see Figure 2). Refer to Technical Note No. 15 for more information.

Figure 2: Assay settings on the Octet systems.
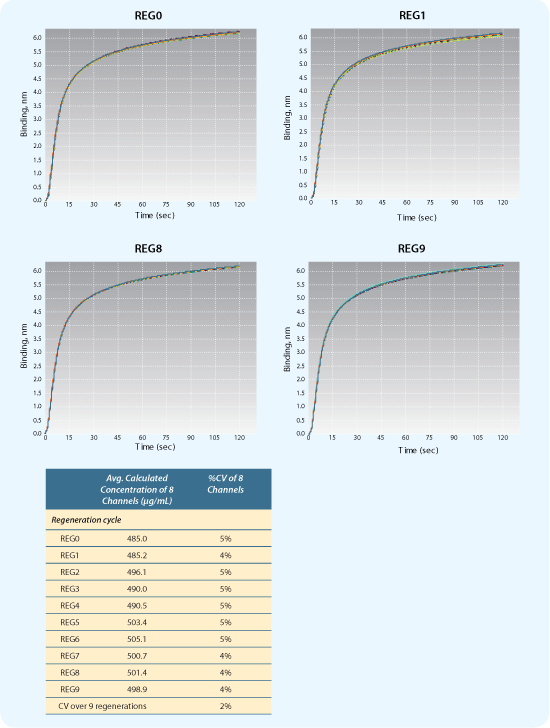
- Protein A, Protein G and Protein L biosensors can be regenerated for re-use. To identify a regeneration solution quickly, choose any one concentration of the sample and verify that it gives the same magnitude response after each successive regeneration cycle to ensure the binding capacity of the biosensor doesn't change after regeneration (Figure 3). For most antibody applications, 10 mM glycine pH 1.5 works well as a starting point. Be sure to use the preconditioning option (see Figure 2) to ensure best results.

Figure 3: Optimal regeneration conditions. Regeneration of Protein A biosensors binding 500 µg/mL hIgG. Example binding curves shown for early (REG0 and REG1) and late regeneration cycles (RED8 and REG9).
For more information or to speak with a local Field Application Scientist about how easy it is to quantite proteins using an Octet instrument, please email support@fortebio.com.
^ TOP |


